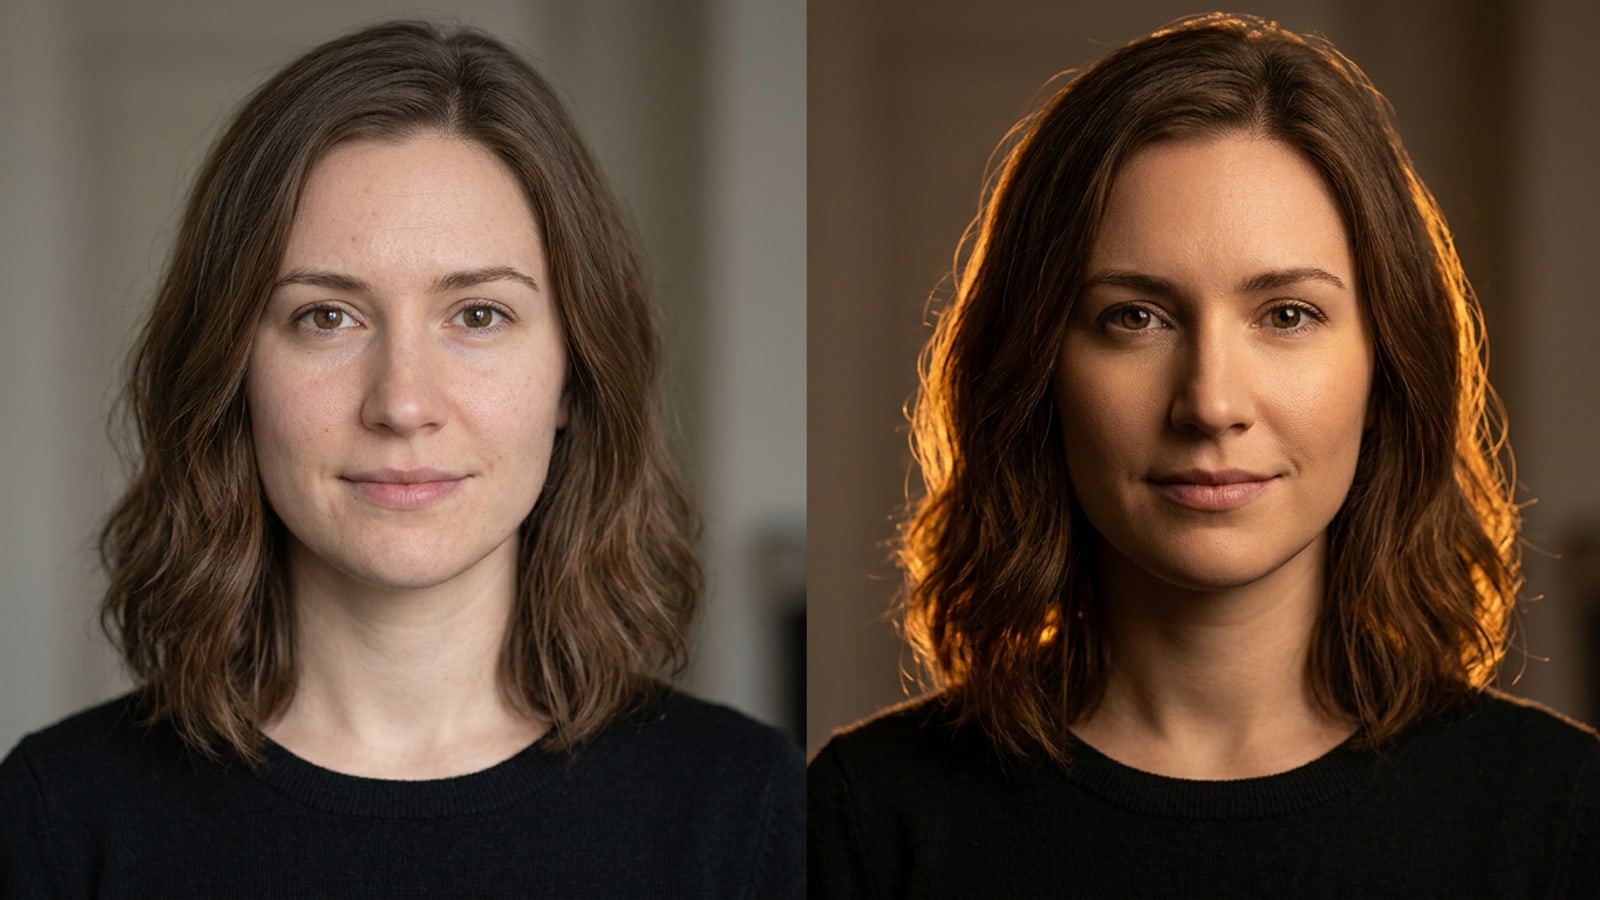
Fixing Flat iPhone Lighting in 30 Seconds
Understand why indoor iPhone portraits look washed out and how conversational AI transforms dull lighting into three-dimensional depth.
Overcast days and bright overhead indoor lights frequently flood iPhone sensors with uniform illumination. While this diffuse ambient light minimizes camera noise, it wipes out natural facial shadows, leaving cheekbones, jawlines, and bridge angles looking completely flat and washed out.[1]
Traditional photo editing apps attempt to correct dull portraits by raising global contrast or applying heavy color filters. However, global adjustments amplify noise and darken entire backgrounds without creating authentic directional key lights or hair highlights.[1][4]
Conversational AI relighting in Cara Agent solves this problem by understanding lighting geometry through natural text prompts. Instead of applying static presets, you simply instruct the AI agent to place imaginary light sources around your subject while preserving face structure.[3]
The Two-Tier Prompt Method: Identity Lock + Directional Lighting
Discover why vague editing prompts fail and how separating face constraints from lighting vectors produces studio-quality results.
When creators prompt AI tools with broad requests like 'make lighting better' or 'add portrait lighting,' diffusion models often average generic dataset portraits, blurring natural skin texture and altering the subject's nose or eye shape.[2][3]
To prevent plastic skin artifacts and facial distortion, structure every prompt into two distinct tiers: Tier 1 acts as an Identity Lock, while Tier 2 defines Directional Light Vectors.[2]
Tier 1 explicitly mandates feature preservation: 'Keep face structure, expression, skin pores, and eye details strictly identical to the original photo.' Tier 2 specifies the light source angle, color temperature, and shadow intensity, ensuring light wraps around cheeks and hair naturally.[1][2]
- Tier 1 (Identity Lock): Enforces strict retention of original eyes, facial geometry, micro-pores, and expression.[2]
- Tier 2 (Light Vector): Defines light angle (e.g., 45 degrees), hue (warm amber, cool white), and shadow falloff.[1]
- Negative constraints: Commands the model to avoid waxy skin, smoothed features, or altered face shape.[2]
Step-by-Step: Relighting Flat Portraits in Cara Agent
Follow a simple workflow inside Cara on iOS to execute conversational lighting edits in under a minute.
Cara on iOS provides conversational photo editing capabilities powered by cloud generative models. You can execute complex portrait relighting directly within the chat interface without manual layers or selection masks.[3]
Because edits are processed in the cloud, generation speeds and lighting rendering can vary depending on network traffic and model workload. Following a standardized submission process ensures reliable results.[3][4]
- Open Cara Agent on iOS
Launch the Cara app on your iPhone or iPad and navigate to Home > Agent to launch the conversational photo editing screen.[3]
- Refine via Follow-Up Instructions
Review the generated result. If shadows are too dark or the rim light is subtle, send conversational follow-ups such as 'Increase rim light glow by 20%' or 'Soften shadow falloff across cheekbones.'[3]
Copyable Lighting Prompt Cards for iPhone Portraits
Use these tailored prompt templates to add rim light separation, warm candle key light, or dramatic Rembrandt shadows.
Different portrait setups call for specific lighting patterns. Classic photography techniques like hair rim lights, 45-degree key lights, and candle glows can all be translated into conversational AI commands.[1][2]
Copy these pre-tested prompt cards into Cara Agent, replacing bracketed variables like [warm amber/cool white] to suit your portrait mood.[3]
- Card 1: High-Contrast Rim Light — 'Keep exact subject facial features, eye shape, and skin texture unchanged. Introduce a strong, narrow [cool-white/amber] rim backlight along hair, shoulders, and jawline to create sharp background separation. Soft frontal fill light.'[1][2]
- Card 2: Warm Candlelight Key Light — 'Preserve original face identity and pore texture completely. Apply a soft warm golden candlelight key light from camera-left at eye level. Create gentle shadow falloff across the off-camera cheek with subtle catchlights in eyes.'[1][2]
- Card 3: Cinematic Rembrandt Triangle — 'Maintain subject identity, expression, and skin integrity. Position a key light 45 degrees to camera-right, casting a distinct Rembrandt shadow triangle beneath the eye on the shadow cheek. High visual contrast with soft gradations.'[1][2]
Troubleshooting Edge Cases & Preserving Facial Texture
Solve skin smoothing artifacts, handle low-resolution source files, and prevent unwanted light spill onto complex backgrounds.
The most common issue during AI portrait relighting is skin over-smoothing. Generative models sometimes fill in pore detail when re-calculating highlights, giving skin a synthetic or waxy appearance.[2][3]
To prevent this artifact, add negative constraints directly to your prompt, such as 'No smooth waxy skin, no loss of micro-texture, preserve fine pore detail and natural freckles.'[2]
Background complexity can also lead to light bleed, where glowing rim lights spill unnaturally onto nearby objects. Instructing the AI agent to 'keep background lighting dim and distinct from subject edge rim' isolates the light vector to your hair and clothing.[1][3]
If your original selfie is tightly cropped and you want to expand the frame into a cinematic shot after fixing the lighting, read our complete guide on uncropping iPhone photos to 16:9 cinematic stills with AI.[3]
- Over-smoothing fix: Include 'natural skin pores, fine texture, sharp focus on iris' in your prompt.[2]
- Background spill fix: Explicitly define background separation parameters and rim light boundaries.[1][2]
- Generation variance: Cloud processing times and initial lighting interpretation vary; submit a minor conversational tweak if the first attempt is too subtle.[3]